Organic Chemistry Laboratory II
Williamson Ether Synthesis: Preparation of Racemic Guaifenesin
Experimental Procedure*
|
|
 Figure
1
|
|
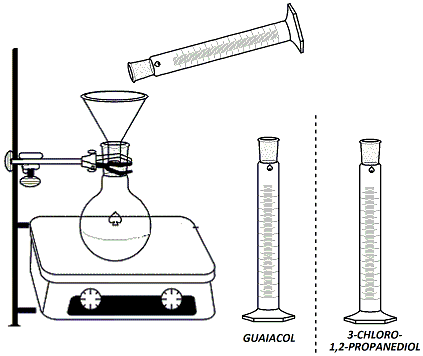
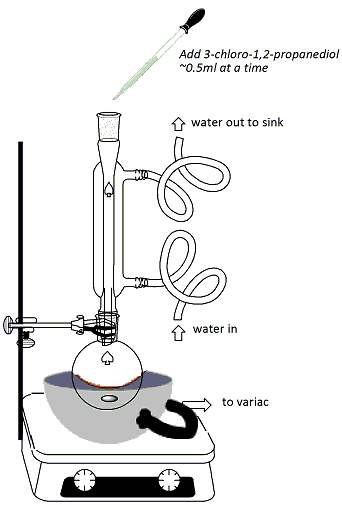
In the hood, clamp a 100ml round-bottomed flask to a ring stand and set the flask over a stirrer/hot plate. Add a stir bar to the flask. Lightly grease the neck of the rb flask. Using the labeled graduated cylinder in the hood, measure 15 ml of guaiacol (2-methoxyphenol) solution (1.33M in 95% ethanol) and add to the flask using a glass funnel (Figure 1). Using a different graduated cylinder (not either of the labeled ones in the hood!), measure 4ml of NaOH solution (25%) and add this solution to the rb flask using the same glass funnel. Fit a heating mantle under the flask. Attach a reflux condenser to the flask and connect one hose to the water outlet and the other hose draining into the sink at the back of the hood (water in from the bottom, out from the top). Connect the heating mantle to the Variac (Be sure to plug in tightly and twist the cord to ensure proper contact) (Figure 2). Begin stirring the reaction mixture. Turn on the water and the Variac and begin heating. Once the reaction mixture reaches reflux, continue heating for 10 minutes. Using the other labeled graduated cylinder in the hood, measure out 4 ml of 3-chloro-1,2-propanediol (5.98M in 95% ethanol). |
|
|
|
After refluxing for 10
minutes, add the solution of 3-chloro-1,2-propanediol
from the graduated cylinder to the reaction through
the top of the reflux condenser using a Pasteur
pipet. Add the solution approximately 0.5ml at a
time (Figure 2), making sure to insert the pipet down
into the reflux condenser so the
3-chloro-1,2-propanediol gets into the reaction flask
and not on the sides of the condenser. Once all
of the 3-chloro-1,2-propanediol is added, continue
refluxing for 30 minutes. After 30 minutes, turn
off the heat, remove the heating mantle, and allow the
reaction mixture to cool to room temperature. Leave
the water on while cooling the reaction mixture.
Remove the stir bar from the reaction flask.
Disassemble the reflux apparatus. Place the rb
flask on a rotary evaporator for ~15minute to remove
the ethanol from the reaction mixture (a few ml of
liquid will remain along with a salt by-product
(NaCl). (Watch a YouTube
video for how to use a rotary evaporator and/or
read more about the rotary
evaporator from Mark Niemczyk, PhD, Professor of
Chemistry at Wheaton College). After the
evaporation is complete, add 12 ml of deionized water
to the flask.
Set up a 125 ml separatory funnel on a ring stand and label two 150ml beakers "organic layer" and "water layer". (Click here for "How to Use a Separatory Funnel") Transfer the reaction mixture from the reaction flask to the separatory funnel. Rinse the reaction flask with 40 ml of ethyl acetate and transfer the rinse to the separatory funnel as well. Stopper the funnel, remove it from the ring and shake and vent the mixture 2-3 times. Return the funnel to the ring stand and allow the layers to separate. Drain and separate the layers into the labeled beakers. Return the water layer to the separatory funnel and extract with an additional 40ml of ethyl acetate. Combine the organic layer from the second extraction with the organic layer from the first extraction. Dry the combined organic layers with magnesium sulfate. Decant the solution off into a clean and dry a 125ml Erlenmyer flask. Cap the flask, wrap in parafilm and store until week 2. End of Week 1
|
|
 Figure
2
|
|
|
|
 Figure 3
|
|
Clamp
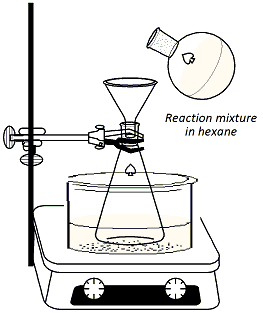
a 125ml Erlenmyer flask to a ring stand and immerse the
flask in an ice bath set over a stirrer/hot plate
(Figure 3). Add 40 ml of hexane to the flask along
with a stir bar. Retrieve the reaction mixture
from Week 1 and transfer the reaction mixture to a 250ml
round-bottomed flask. Place the rb flask on the rotary
evaporator to remove the ethyl acetate. After the
ethyl acetate is removed (a few ml of an oil will
remain), transfer the crude oil (reaction product) to
the 125ml Erlenmyer flask containing the chilled hexane.
A solid may may precipitate from the oil during this
process, so use a spatula to facilitate a complete
transfer of the product. Once all of the product
is placed in the Erlenmyer flask, begin stirring the
cooled solution and stir for ~10 minutes. Stop
stirring the mixture and allow the solid to precipitate.
(This may take 5-10 minutes). Decant off the hexane and
add ~40ml of 50:50 ethyl acetate:hexane to recrystallize the solid.
Gently warm the solution using a water bath to dissolve
the solid. Once the solid is completely
dissolved. Turn off the heat and allow the
soultion to cool to room temperature undisturbed to
allow the product to slowly precipitate from solution.
(Do not sitr the flask!). Once the solution is
cooled to rt, add ~10-20ml of hexane and immerse the
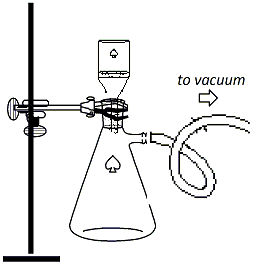
flask in an ice bath to induce precipitation. Vacuum filter the recrystallized product as follows: Clamp a 250ml vacuum flask to a ring stand and connect the flask to the vacuum outlet using a thick-walled vacuum hose (Figure 4). Insert an adapter and a Buchner funnel into the top of the flask and place a piece of filter paper into the funnel. Turn on the vacuum and wet the fiter paper with ~5ml of hexane. Pour the reaction mixture into the top of the funnel to collect the solid that precipitated from the hexane. Wash the solid with ~10ml of cold hexane. Allow the vacuum to remain on for a few minutes, then break the vacuum by removing the hose from the flask, then shut off the vacuum. Transfer the solid from the Buchner funnel to a watch glass and allow it to dry on the watchglass in the hood. |
|
|
 Figure 4
|
|
After the solid product is dry, weigh the product, record the mass and calculate the percent yield using guaiacol (2-methoxyphenol as limiting reagent). Determine a melting point for the product and record the mp range in your notebook. Compare the experimental mp of your product with the mp of (+)-guaifenesin reported in the literature. Run a TLC analysis on the product (Figure 5) (dissolve ~10mg of product in 2ml of 95% ethanol for the TLC analysis) against guaiacol and authentic (+)-guaifenesin. Use 50:50 hexane: ethyl acetate as the developing solvent. Use both UV and I2 as detection methods for the TLC analysis. Record Rf values and the results in your notebook. Proton NMR and mass spectral data are provided for the two starting materials and authentic (+)-guaifenesin. Match the provided spectra to the proper structures. For the proton NMR spectra, identify all of the protons in the starting materials and the product, and match the protons to the peaks in each of the NMR spectra. Match the mass spectra to the proper structure based on molecular weight (and isotope mass and relative abundance for halogen-containing compounds). |
|
 Figure 5
|
|
|
|
Proton NMR Spectra Spectrum A Spectrum B Spectrum C |
|
Mass Spectral Data Spectrum A Spectrum B Spectrum C |
|